एक पेशेवर ईमेल पता कैसे बनाएं? (मुफ्त ट्यूटोरियल), मुफ्त में ईमेल पता कैसे बनाएं? (4 उपकरण)
मुफ्त में एक ईमेल पता कैसे बनाएं? (4 मुफ्त उपकरण)
Contents
- 1 मुफ्त में एक ईमेल पता कैसे बनाएं? (4 मुफ्त उपकरण)
- 1.1 एक पेशेवर ईमेल पता कैसे बनाएं ? (ट्यूटोरियल + फ्री टिप)
- 1.2 पेशेवर ईमेल पता: कुछ जानकारी जानने के लिए
- 1.3 प्रो पता बनाने के लिए क्या पूर्वापेक्षाएँ हैं ?
- 1.4 एक मुफ्त प्रो ईमेल पता कैसे बनाएं: ट्यूटोरियल
- 1.5 सारांश
- 1.6 मुफ्त में एक ईमेल पता कैसे बनाएं ? (4 मुफ्त उपकरण)
- 1.7 #Short में मुफ्त में एक ईमेल बॉक्स बनाएं:
- 1.8 एक नया ईमेल पता कैसे बनाएं ?
- 1.9 उपयोग किए गए मेलबॉक्स के अनुसार प्रक्रिया
- 1.10 एक ईमेल पते के निर्माण पर प्रश्न
- 1.11 GMX: एक मेलबॉक्स का निर्माण
- 1.12 एक GMX मेलबॉक्स बनाएं: फायदे
- 1.13 एक ही समय में अपने ईमेल पते प्रबंधित करें
- 1.14 बहुत कम फ़ाइल सीमा को अलविदा
- 1.15 मेल बॉक्स: बेहतर सुरक्षा
एक पेशेवर ईमेल पता बनाने के लिए, आपको हर कीमत पर अपने कब्जे में एक डोमेन नाम होना चाहिए. इसके बिना, आप बस आगे नहीं जा पाएंगे.
एक पेशेवर ईमेल पता कैसे बनाएं ? (ट्यूटोरियल + फ्री टिप)
पेशेवर संदर्भ में, ईमेल (ई-मेल) एक महत्वपूर्ण स्थान पर कब्जा कर लेता है. यह स्पष्ट रूप से व्यवसाय में संचार n ° 1 का साधन है, और यह कि अन्य प्रौद्योगिकियों के आगमन के बावजूद, विशेष रूप से तत्काल संदेश में. यदि आप एक व्यवसाय स्थापित करना चाहते हैं, तो एक उपयुक्त ईमेल पता होना आवश्यक है. आपके दृष्टिकोण में आपकी सहायता करने के लिए, इसलिए हम आपको यह समझाने के लिए समय निकालेंगे कि एक प्रो ईमेल पता कैसे बनाया जाए.
आप देखेंगे कि इसमें बहुत समय नहीं लगेगा और इसके अलावा, बर्बाद किए बिना एक या अधिक दर्जन ईमेल पते का आनंद लेना संभव है.
पेशेवर ईमेल पता: कुछ जानकारी जानने के लिए
एक पेशेवर ईमेल पता क्या है ? यह एक पता है जिसमें आपका व्यवसाय डोमेन नाम शामिल है. यह आपको @gmail में एक ईमेल पता होने से बचने की अनुमति देता है.com या @yahoo.उदाहरण के लिए, fr.
चूंकि एक अच्छा मौका है कि आप अपने मौजूदा या संभावित ग्राहकों को ईमेल भेजते हैं, यह अच्छा है कि आपका ईमेल पता अद्वितीय और पेशेवर है (कोई आंकड़े या शानदार वर्ण नहीं).
तो हाँ जीमेल, याहू और कंपनी का पता बहुत व्यावहारिक हैं और उन्हें मुक्त होने का फायदा है. अब वे बहुत सामान्य हैं और यह तथ्य कि हर कोई एक ईमेल पता @gmail बना सकता है.कॉम अपने वार्ताकारों पर भरोसा करने में मदद नहीं करता है. वे बहुत अच्छी तरह से एक सूदखोर के सामने हो सकते हैं.
एक पेशेवर ईमेल पता बनाना बहुत सारे फायदे के साथ आता है. यहाँ मुख्य लोगों का अवलोकन है:
- एक व्यक्तिगत ईमेल पता बहुत अधिक पेशेवर है
- यह आपको उन लोगों का विश्वास हासिल करने की अनुमति देता है जिनसे आप संपर्क करते हैं
- यह लोगों के लिए आसानी से अपने प्रो पते को बनाए रखने का एक शानदार तरीका है
- यह आपको ईमेल द्वारा अपनी सेवाओं को बढ़ावा देने की अनुमति देता है
और इस सब में बहुत अच्छी खबर यह है किएक मुफ्त पेशेवर ईमेल पता बनाना संभव है. यह कहने के लिए पर्याप्त है कि आपके पास कोई बहाना नहीं है और आपको डुबकी लेना है.
कैसे ? किस सेवा के साथ ? हम आपको और अधिक बताएंगे. लेकिन इससे पहले, हम आपको एक व्यावसायिक ईमेल पते के निर्माण के लिए आवश्यक शर्तों के बारे में बताते हैं.
प्रो पता बनाने के लिए क्या पूर्वापेक्षाएँ हैं ?
एक पेशेवर ईमेल पता बनाने के लिए, आपको हर कीमत पर अपने कब्जे में एक डोमेन नाम होना चाहिए. इसके बिना, आप बस आगे नहीं जा पाएंगे.
दूसरा पहलू जो आवश्यक रूप से आवश्यक नहीं है, लेकिन यह अच्छा है, यह एक वेबसाइट है. आप निश्चित रूप से जानते हैं, आपकी गतिविधि, अपने कौशल आदि को प्रस्तुत करने वाली वेबसाइट का होना बेहद महत्वपूर्ण है।. यह टिप्पणी आपकी गतिविधि के क्षेत्र में कोई फर्क नहीं पड़ता है.
यदि आपको अभी तक एक वेबसाइट बनाने का अवसर नहीं मिला है, तो जान लें कि आप बेहतर नहीं हो सकते हैं. परिणाम के रूप में प्रस्तुत समाधान आपको वेब होस्टिंग (उदाहरण के लिए एक वर्डप्रेस साइट बनाने के लिए), एक डोमेन नाम और एक या अधिक पेशेवर ईमेल पते प्राप्त करके उच्च गति पर स्विच करने की अनुमति देगा.
एक मुफ्त प्रो ईमेल पता कैसे बनाएं: ट्यूटोरियल
यह गंभीर चीजों में आने का समय है. निम्नलिखित ट्यूटोरियल के माध्यम से, हम बताएंगे, कदम से कदम, एक मुफ्त पेशेवर ईमेल पता कैसे बनाएं.
ध्यान दें कि क्या मुफ्त होगा आपके ईमेल पते का निर्माण है. वेब आवास और एक डोमेन नाम का लाभ उठाने में सक्षम होने के लिए एक छोटे पैकेज का भुगतान करना अभी भी आवश्यक होगा. आश्वस्त हो, इससे बाहर निकलना संभव है यदि आप हमारी सिफारिशों का पालन करते हैं तो प्रति माह 3 € से कम. यह कहने के लिए पर्याप्त है कि लागत में महारत हासिल होगी.
एक और बात. वर्णित दृष्टिकोण किसी के लिए सरल और सुलभ है (या वेबसाइट नहीं है). आपको एक पेशेवर ईमेल पता बनाने में सफल होने के लिए उन्नत ज्ञान की आवश्यकता नहीं है, सभी मुफ्त में.
चरण 1: वेब आवास प्राप्त करें
बहुत से लोग जो अनदेखा कर रहे हैं, वह यह है कि कुछ वेब होस्टिंग कंपनियां अपने विभिन्न ऑफ़र के साथ पेशेवर ईमेल पते प्रदान करती हैं.
लेकिन फिर कौन सा वेब इस मिशन को पूरा करने के लिए चुनने के लिए होस्ट करता है ? हमारी सिफारिश होस्टिंगर है. बहुत सारे वेब होस्ट का परीक्षण करने का अवसर होने के बाद, हम यह देख सकते थेयह सबसे अच्छी गुणवत्ता/मूल्य अनुपात की पेशकश करने वाला है. यह कुछ भी है, लेकिन मौका है अगर कई मिलियन साइटों को कंपनी के सर्वर पर समायोजित किया जाता है.

श्रेणी साझा, वीपीएस, क्लाउड, मिनीक्राफ्ट
WordPress के, जूमला, मैजेंटो, प्रेस्टशॉप
तीस दिन संतुष्ट या वापस किया गया
![]()
पदोन्नति : 01NET (-10%)
– विशेष प्रस्ताव -80%
– बिल्ली द्वारा ग्राहक सहायता (फ्रेंच में)
– नि: शुल्क प्रवासन
– नि: शुल्क डोमेन नाम
– फ्रांस में डेटासेंटर
हमारा विचार : एक अपराजेय गुणवत्ता/मूल्य अनुपात के साथ सबसे अच्छा वेब होस्ट.
होस्टिंगर के साथ, आप वेब होस्टिंग के दृष्टिकोण से कुछ भी याद नहीं करेंगे. मेजबान का फ्रांस और अन्य यूरोपीय देशों में एक डेटासेंटर है, एक पर्याप्त भंडारण स्थान, उत्कृष्ट प्रदर्शन, 100%के करीब एक अपटाइम, एसएसएल प्रमाणपत्रों की पेशकश के साथ -साथ एक मुफ्त डोमेन नाम (इस ट्यूटोरियल की कुंजी) तक पहुंच प्रदान करता है। !)).
इन सबसे ऊपर, यह तथ्य कि मुफ्त पेशेवर ईमेल पते बनाना संभव है, एक वास्तविक प्लस है. आप गिन सकते हैं प्रति मेल खाते में 1 जीबी का भंडारण स्थान, क्या बल्कि संतोषजनक है. यदि आवश्यक हो, तो आप स्पष्ट रूप से अधिक उदार प्रस्ताव (10 जीबी) पर स्विच कर सकते हैं. हम यह सब निर्दिष्ट करते हैं क्योंकि अन्य वेब होस्ट एक प्रो ईमेल पते का लाभ उठाने के लिए प्रति माह 5 से 10 € चार्ज करने में संकोच नहीं करते हैं.
होस्टिंगर भी ग्राहक सहायता उपलब्ध है 24/7 और 30 दिनों की एक संतुष्ट या प्रतिपूर्ति वारंटी.
⚠ होस्ट की संतुष्ट या वापस की गई वारंटी का उपयोग करके, आप अपने डोमेन नाम को मुक्त नहीं रख पाएंगे. यह अनुरोध करने से पहले जागरूक रहें. क्योंकि डोमेन नाम का नुकसान कौन कहता है, यह भी कहता है कि आपके पेशेवर ईमेल पते का नुकसान मुफ्त में बनाया गया है.
सभी ने कहा, क्या प्रस्ताव के लिए प्रस्ताव के लिए ? हम आपको सलाह देते हैं कि आप इसके साझा आवास पर जाएं, जिसे “प्रीमियम” प्रति माह € 2.89 पर कहा जाता है. उसके साथ, आप एक नि: शुल्क डोमेन नाम (जो प्रति यूनिट विमान के साथ ऐसा नहीं है) से लाभान्वित हो पाएंगे और आप 100 मुफ्त पेशेवर ईमेल पते बना सकते हैं.
अब यह देखने के लिए कि कौन सी योजना आपकी आवश्यकताओं को पूरा कर सकती है, यह देखने के लिए होस्टिंगर प्राइसिंग ग्रिड को ब्राउज़ करने में संकोच न करें. होस्टिंगर के बारे में हमारी पूरी राय भी आपको और अधिक स्पष्ट रूप से देखने में मदद करने के लिए है.
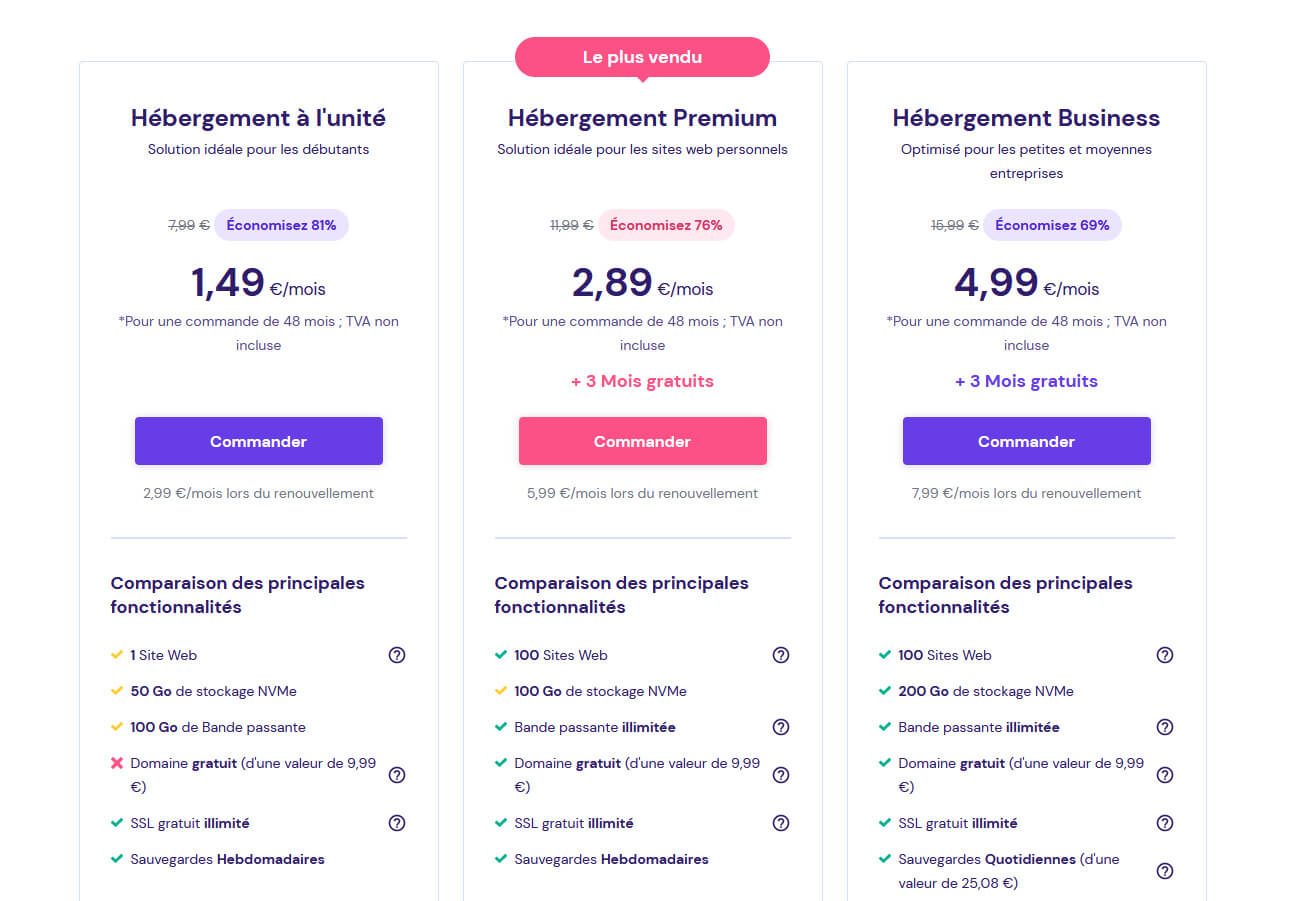
एक बार जब आपको वह योजना मिल जाती है जो आपको सूट करती है, तो आपको केवल अपनी प्रतिबद्धता अवधि का चयन करना होगा. इस स्तर पर, और कई अन्य मेजबानों की तरह, होस्टिंगर उन लोगों को सबसे अधिक छूट प्रदान करता है जो कई वर्षों में संलग्न हैं.
अपना ईमेल पता भरें और फिर भुगतान करें. जैसे ही यह किया जाता है, आप इस ट्यूटोरियल के चरण 2 पर जा सकेंगे कि एक पेशेवर ईमेल पता कैसे बनाएं.
यदि आप अन्य गुणात्मक विकल्पों के साथ होस्टिंगर की तुलना करना चाहते हैं, तो हम आपको सलाह देते हैं कि आप प्लेनथोस्टर या O2SWITCH पक्ष देखें. यद्यपि वे होस्टिंगर की तुलना में थोड़ा कम आकर्षक हैं, वे एक वेबसाइट की मेजबानी करने के लिए उत्कृष्ट विकल्प बने हुए हैं, एक मुफ्त डोमेन नाम प्राप्त करें और एक ईमेल पते का निर्माण करें.
चरण 2: एक डोमेन नाम सहेजें
अपने होस्टिंगर खाते के डैशबोर्ड से, अब आपको उस डोमेन नाम को रिकॉर्ड करना होगा जो आपको रुचिकर करता है और आप अपना ईमेल ईमेल पता देखना चाहते हैं.
जैसा कि हमने ऊपर निर्दिष्ट किया है, डोमेन नाम होस्टिंगर द्वारा पेश किया गया है (पहले वर्ष के दौरान). इस प्रस्ताव के लिए पात्र एक्सटेंशन विशेष रूप से हैं: .कॉम, .फादर, .जाल, .org और कई अन्य.
अपनी पसंद के डोमेन नाम को रिकॉर्ड करने के लिए, आपको बस इसे इस तरह एक इंटरफ़ेस के माध्यम से दर्ज करना होगा:
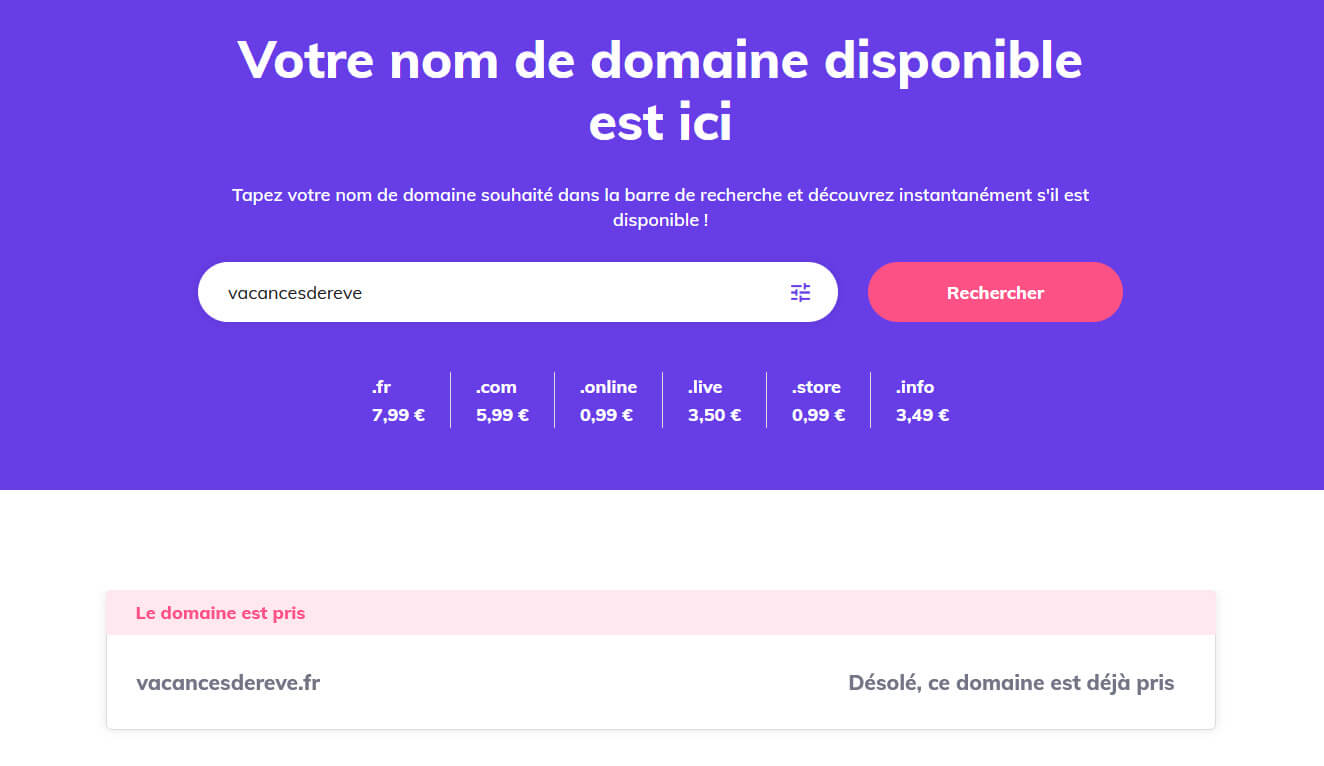
यदि डोमेन नाम उपलब्ध है, तो आप पंजीकरण कर सकते हैं. अन्यथा, आपको होस्टिंगर द्वारा सूचित किया जाएगा कि डोमेन नाम पहले से ही लिया गया है (ऊपर स्क्रीनशॉट देखें).
आपको यकीन नहीं है कि आपने सब कुछ समझा होगा ? इस मामले में, हम आपको एक मुफ्त डोमेन नाम प्राप्त करने के लिए हमारे गाइड को ब्राउज़ करने की सलाह देते हैं, फिर अपने पेशेवर ईमेल पते के निर्माण को अंतिम रूप देने के लिए लौटते हैं.
चरण 3: अपना प्रो ईमेल पता बनाएं
यहाँ हम इस अंतिम गाइड के प्रमुख चरण में हैं. अब जब आपके पास एक डोमेन नाम है, तो आप एक पेशेवर ईमेल पते का मुफ्त निर्माण कर सकते हैं.
अपने होस्टिंगर ग्राहक खाते से, “ईमेल” मेनू पर जाएं:
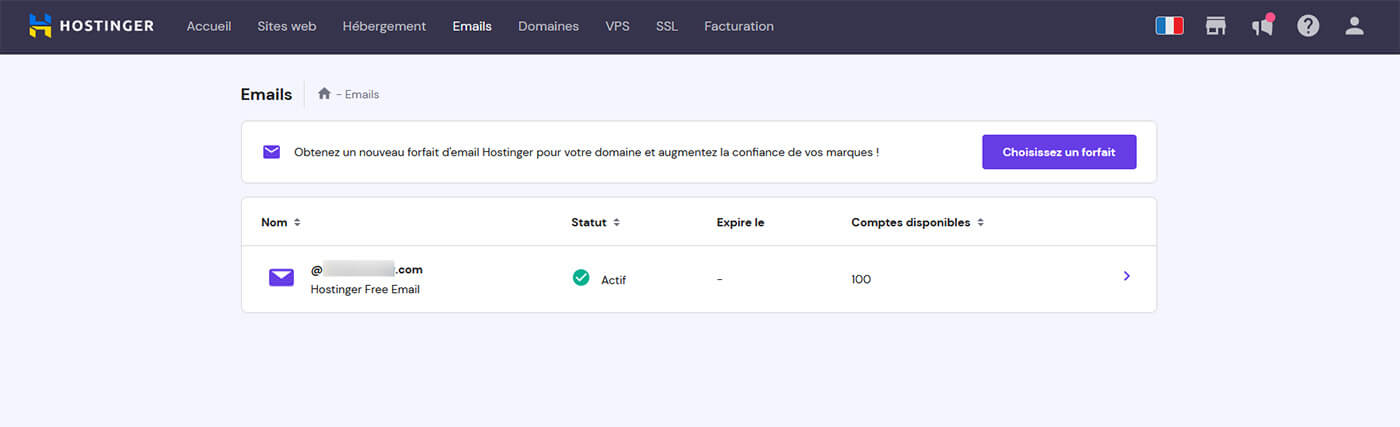
फिर अपने डोमेन नाम के अनुरूप लाइन पर क्लिक करें. वेब होस्ट तब आपको निम्नलिखित इंटरफ़ेस में पुनर्निर्देशित करेगा:
यह इस से है कि आप एक ईमेल खाता बना पाएंगे, लेकिन उपनाम, रीडायरेक्ट, डीएनएस सेटिंग्स और बहुत कुछ का प्रबंधन भी करेंगे. एक ईमेल पता बनाने के लिए लक्ष्य है, “एक ईमेल खाता बनाएँ” विकल्प पर क्लिक करें.
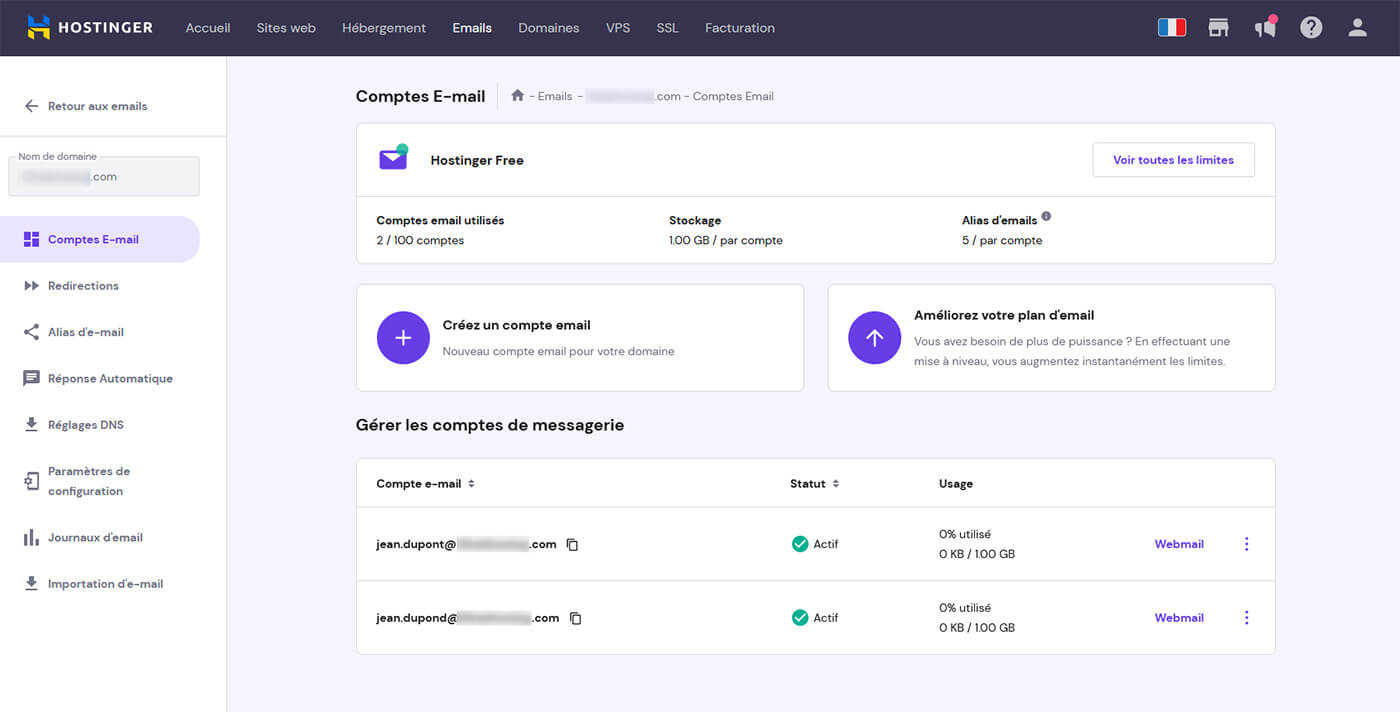
आपके सामने निम्नलिखित इंटरफ़ेस होगा:
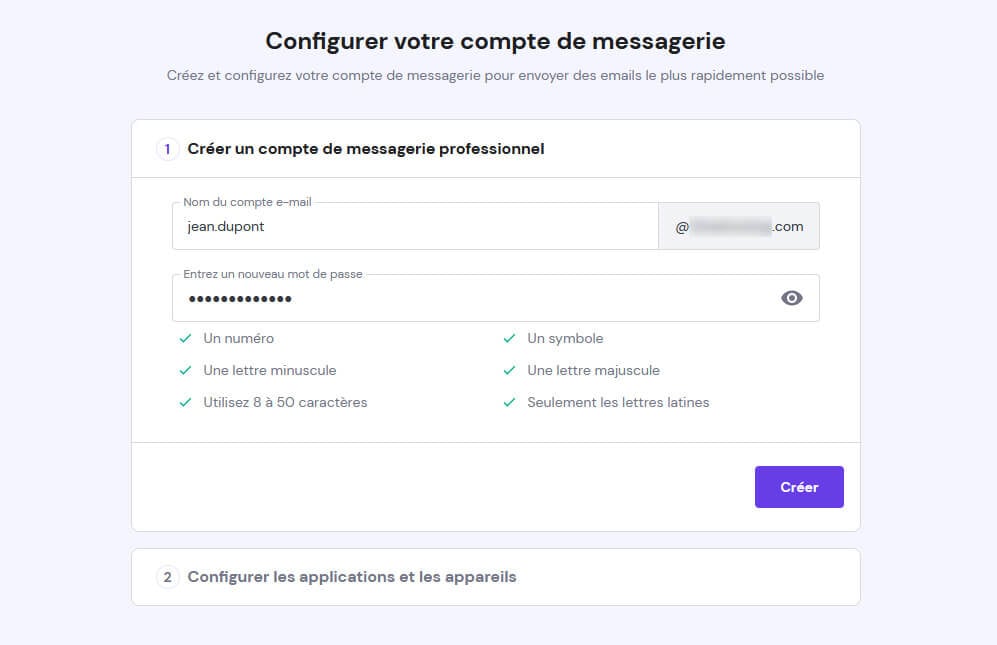
इसके माध्यम से, यह आपके ई-मेल खाते के लिए उपयोग किए जाने वाले नाम को सूचित करने के लिए पर्याप्त होगा और फिर सिफारिशों के अनुसार एक पासवर्ड को परिभाषित करें (चित्रा, वर्णों की संख्या, प्रतीक, लोअरकेस और अपरकेस पत्र). “क्रिएट” बटन पर क्लिक करके सेट को मान्य करें.
और वहाँ आपने इस मिशन को अच्छा होने के लिए परंपरा दिया है ! हालांकि, चरण 4 के लिए हमारे साथ रहें क्योंकि सब कुछ खत्म नहीं हुआ है.
चरण 4: अपने विभिन्न उपकरणों पर अपनी कंपनी मेलबॉक्स को कॉन्फ़िगर करें
अब जब आप अपना मुफ्त पेशेवर ईमेल पता बनाने में सक्षम हो गए हैं, तो आपको अपने पसंदीदा मैसेजिंग क्लाइंट को कॉन्फ़िगर करना होगा. उस ने कहा, यदि आप होस्टिंगर द्वारा उपलब्ध कराए गए वेबमेल से गुजरना पसंद करते हैं, तो यह जान लें कि पता इस प्रकार है: https: // ईमेल.मेजबानी.com/
इस मामले में, आपको केवल अपने मेलबॉक्स का लॉगिन और पासवर्ड दर्ज करना होगा.
यदि आप Outlook, Apple मेल, थंडरबर्ड या Gmail एप्लिकेशन पर अपने ईमेल पढ़ना चाहते हैं, तो आपको अपने मैसेजिंग क्लाइंट पर एक नया ईमेल खाता कॉन्फ़िगर करना होगा.
मैसेजिंग क्लाइंट क्या है ? एक मैसेजिंग क्लाइंट एक कंप्यूटर प्रोग्राम है जिसका उपयोग ईमेल (या ईमेल) को पढ़ने और भेजने के लिए किया जाता है. यह वह तत्व है जिसके साथ उपयोगकर्ता बातचीत करता है. यह एक मैसेजिंग सर्वर के साथ भ्रमित नहीं होना चाहिए जिसका उद्देश्य आपके ईमेल को स्टोर और परिवहन करना है.
मैसेजिंग क्लाइंट का कॉन्फ़िगरेशन ईमेल पता बनाने के लिए होस्टिंगर द्वारा प्रस्तावित प्रक्रिया के दूसरे चरण का हिस्सा है:
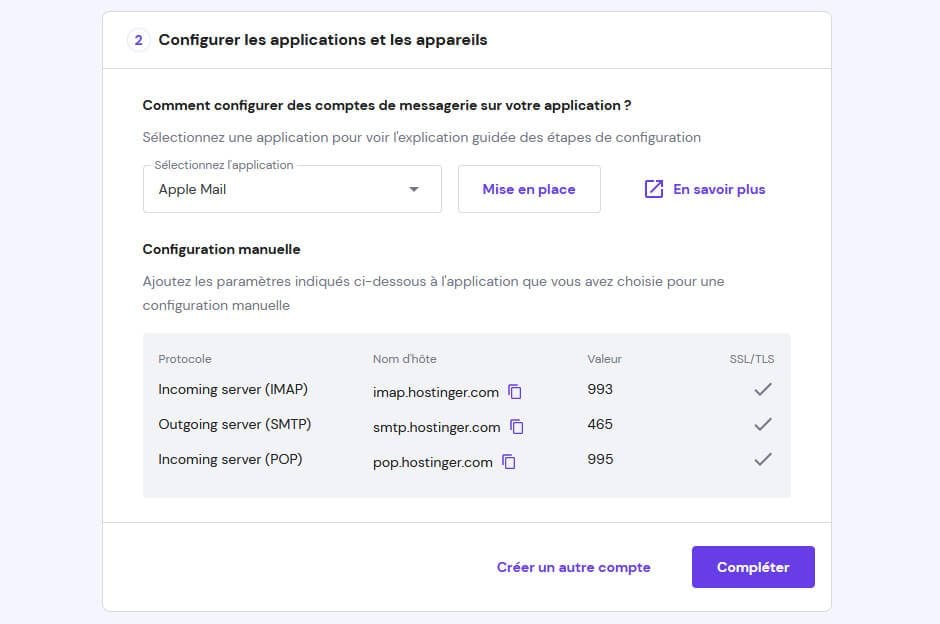
जैसा कि आप ऊपर दिए गए स्क्रीनशॉट पर देख सकते हैं, होस्टिंगर आपको अपना ईमेल पता (पोर्ट और एसएमटीपी, आईएमएपी और पॉप प्रोटोकॉल के लिए पोर्ट और पता) को कॉन्फ़िगर करने के लिए सभी जानकारी देता है. एक बार जब आप इस जानकारी को पढ़ने में सक्षम हो जाते हैं, तो अंत में “पूर्ण” पर क्लिक करें.
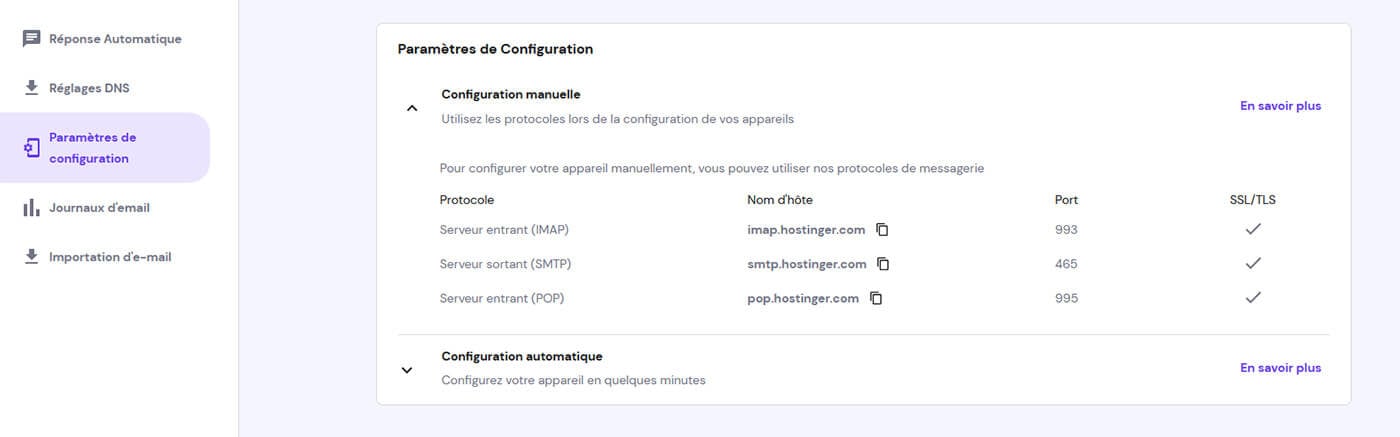
ध्यान दें कि आपके होस्टिंगर डैशबोर्ड के “ईमेल” मेनू पर जाकर किसी भी समय इस जानकारी से परामर्श करना संभव है, फिर “कॉन्फ़िगरेशन पैरामीटर”:
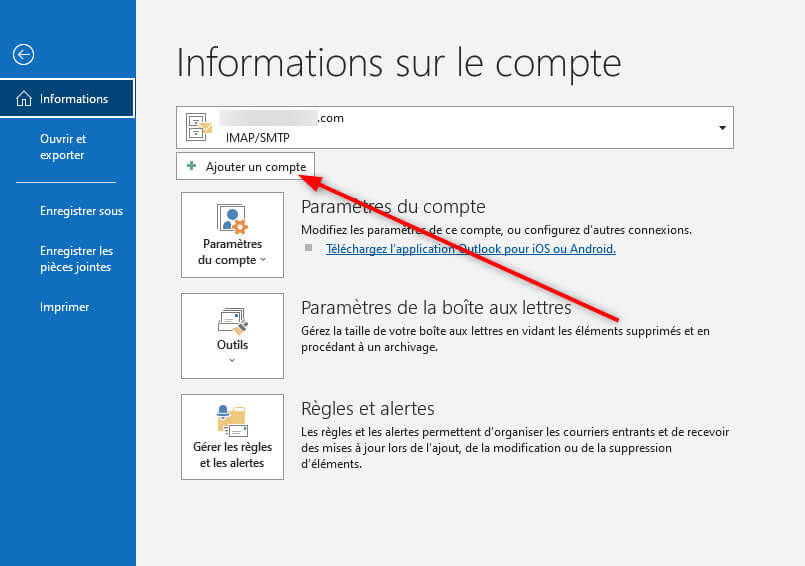
आपको एक विचार देने के लिए, आउटलुक पर आपको “फ़ाइलों” में एक नया खाता जोड़ने का विकल्प मिलेगा, फिर “सूचना”. एक बार जब आपको बटन “एक खाता जोड़ें” मिल गया है, तो आपको केवल उन चरणों का पालन करना होगा जो आपको दिखाई देंगे. यदि आप किसी अन्य मैसेजिंग क्लाइंट का उपयोग करते हैं तो यह दृष्टिकोण व्यावहारिक रूप से समान है.
सारांश
एक पेशेवर ईमेल पता कॉन्फ़िगर और बनाएं अपने पेशेवर एक्सचेंजों के लिए ठोस नींव रखना है. यह हमारी नजर में अपने व्यवसाय की गंभीरता को साबित करने के लिए एक अनिवार्य मार्ग है, और यह गतिविधि के क्षेत्र से कोई फर्क नहीं पड़ता.
यही कारण है कि हम आपको समझाना चाहते थे कि एक मुफ्त पेशेवर ईमेल पता कैसे बनाया जाए. जैसा कि आपने हमारे ट्यूटोरियल के माध्यम से देखा है, दृष्टिकोण अपेक्षाकृत सरल और त्वरित है. कंप्यूटर ज्ञान के बिना भी, आप वहां पहुंच पाएंगे.
इन सबसे ऊपर, होस्टिंगर जैसी कंपनी के साथ, आपके पास एक पत्थर के साथ दो स्ट्रोक को मारने का अवसर होगा क्योंकि इसकी एक योजना के लिए चयन करके, आपको मिलेगा: वेब आवास, एक डोमेन नाम, साथ ही साथ एक या बनाने की संभावना अधिक मुफ्त ईमेल पते.
मुफ्त में एक ईमेल पता कैसे बनाएं ? (4 मुफ्त उपकरण)
क्या ईमेल पता बनाना आसान है ? हम कैसे आगे बढ़ना चाहिए ? यहाँ आसान और मुफ्त उपकरण हैं.
आपके नाम पर कभी कोई ईमेल पता नहीं था ? आप एक नया बनाना चाहते हैं ? ईमेल पता आज संचार का एक बहुत महत्वपूर्ण साधन है, चाहे वह व्यक्तिगत या व्यावसायिक उपयोग के लिए हो. एक ईमेल पते का उपयोग अन्य चीजों की एक भीड़ के लिए भी किया जाता है, खासकर जब आपको एक ऑनलाइन प्लेटफ़ॉर्म पर एक खाता बनाने की आवश्यकता होती है, नेट पर अपनी खरीद के दौरान या ईमेल और कई अन्य कारणों से नकद टिकट प्राप्त करने के लिए. सब कुछ, या लगभग, ईमेल पते द्वारा किया जाता है. हम इस लेख में देखेंगे कि मुफ्त में एक ईमेल पता कैसे बनाएं और सबसे अच्छी सेवाएं क्या हैं जो आपको मुफ्त पहुंच प्रदान करती हैं.
त्वरित पहुंच (सारांश):
#Short में मुफ्त में एक ईमेल बॉक्स बनाएं:
- एक मुफ्त जीमेल मेलबॉक्स बनाने के लिए यहां क्लिक करें और प्रदर्शित निर्देशों का पालन करें: https: // खाता.गूगल.Com/साइनअप/v2/createaccount
- Outlook मेलबॉक्स (Microsoft Live) बनाने के लिए यहां क्लिक करें और प्रदर्शित निर्देशों का पालन करें: https: // Go.माइक्रोसॉफ्ट.com/fwlink/p/?LINCID = 2125440 & clcid = 0x40c और संस्कृति = fr-fr & देश = fr
- यदि आप एक सुरक्षित ईमेल पता बनाना चाहते हैं, तो आप मुड़ सकते हैं प्रचुरता.
एक नया ईमेल पता कैसे बनाएं ?
सबसे पहले, आपको पता होना चाहिए कि कई प्लेटफार्म हैं एक मुफ्त मेलबॉक्स बनाएं.
इस लेख में हम आपके द्वारा प्रस्तुत किए जाने वाले सभी प्लेटफार्मों को आपके भविष्य के ईमेल पते के निर्माण के लिए स्वतंत्र हैं, इसलिए आप जिस व्यक्ति को चुनने का फैसला करेंगे, उसकी परवाह किए बिना, आपको इसके उपयोग के लिए भुगतान नहीं करना होगा.
एक ईमेल पते का निर्माण अपेक्षाकृत तेज है और 5 मिनट से अधिक नहीं लेगा.
उपयोग किए गए मेलबॉक्स के अनुसार प्रक्रिया
कैसे एक मुफ्त जीमेल पता बनाने के लिए ?
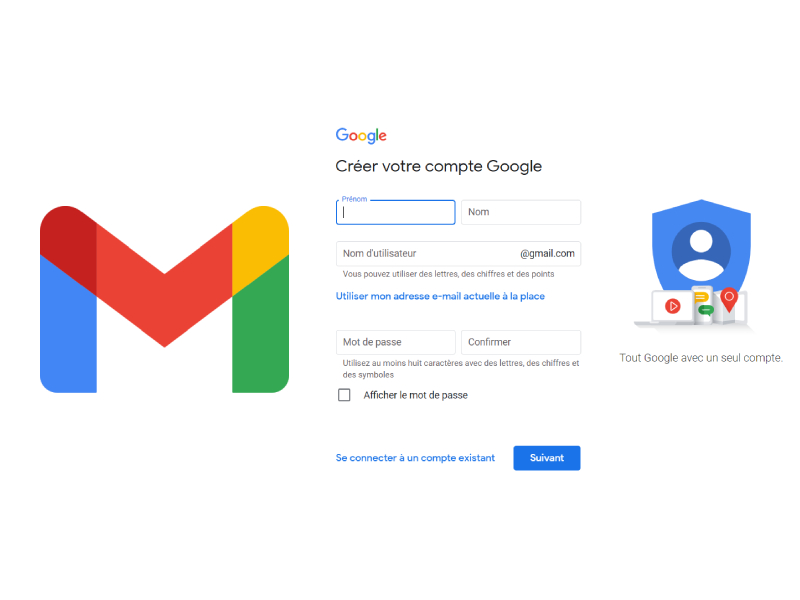
कर सकते हैं Gmail पर मुफ्त में एक ईमेल पता बनाएं, इसके साथ शुरू करना आवश्यक होगा इस सेवा तक पहुंचने के लिए एक Google खाता बनाएँ.
यदि आपके पास पहले से ही एक Google खाता है, तो बस जीमेल सेवा पर जाएं अपने Google खाते से अपना उपयोगकर्ता नाम और पासवर्ड दर्ज करके ईमेल का लाभ उठाने के लिए.
इस घटना में कि आपके पास Google खाता नहीं है, आपको एक खाता बनाना होगा जो तब आपको अपना Gmail ईमेल पता करने की अनुमति देगा.
Google खाता क्यों खोलें ?
Google खाते का निर्माण Google से सभी सुविधाओं तक पहुंचने की अनुमति देता है, जिसमें Google Docs दस्तावेज़, Google ड्राइव पर मुफ्त 15 GB, YouTube वीडियो, Google मैप्स का उपयोग और कई अन्य मुफ्त सेवाएं शामिल हैं.
Google खाते का निर्माण
प्रक्रिया अपेक्षाकृत सरल है: आपको अपने ईमेल पते के लिए पहला नाम, एक नाम और अपने उपयोगकर्ता नाम डालने के लिए कहा जाएगा. अपने ईमेल पते की पसंद के लिए, आप अपना नाम उदाहरण के लिए अपना पहला नाम रख सकते हैं.
ईमेल पता पहले से ही किसी अन्य उपयोगकर्ता द्वारा लिया जा सकता है. Google ने तब आपके विचार के वेरिएंट का सुझाव दिया, चाहे आप स्वीकार कर सकते हैं या नहीं. यदि आप सुझावों का उपयोग नहीं करना चाहते हैं, तो आपको एक और उपयोगकर्ता नाम विचार खोजने की आवश्यकता होगी.
ध्यान दें कि Gmail के साथ, खातों की सबसे अच्छी रक्षा करने के लिए नाम और पहले नाम के बीच एक बिंदु डालने का कोई मतलब नहीं है. उदाहरण के लिए, यदि लेप्टिडिजिटल पता.अनुच्छेद@gmail.कॉम पहले से मौजूद है, तो Google विचार करेगा कि एक पते के लिए उपयोगकर्ता नाम: LeptidigitalArticle@gmail.कॉम (बिंदु के बिना) भी मौजूद है और यह वही जीमेल मेलबॉक्स है.
इसके बाद, आपसे अपने Google खाते को यथासंभव सुरक्षित करने के लिए एक फ़ोन नंबर मांगा जाएगा और साथ ही साथ आपके बारे में अतिरिक्त जानकारी भी. इसलिए आपको एक कोड प्राप्त होगा, एसएमएस द्वारा या कॉल द्वारा, जिसे आपको अपने खाते को मान्य करने के लिए दर्ज करना होगा. आपका फ़ोन नंबर सुरक्षा का एक अच्छा तरीका है और पासवर्ड रिकवरी के रूप में भी कार्य करता है, अगर हम एक दिन स्वीकार करते हैं, तो आप अपना पासवर्ड भूल जाते हैं.
तब आपको करना होगा अनुकूलन सेटिंग्स चुनें, और 2 मोड आपके लिए उपलब्ध हैं: डिफ़ॉल्ट रूप से, हम एक्सप्रेस मोड का चयन करेंगे.
एक झटका कि सभी पिछले चरणों, आपका Google खाता अंततः बनाया जाएगा और आप Gmail स्थान तक पहुंच सकते हैं.
यदि आप वीडियो स्पष्टीकरण पसंद करते हैं, तो यहां अपना Gmail ईमेल पता बनाने के लिए एक सरल ट्यूटोरियल है:

आउटलुक के साथ एक ईमेल खाता बनाएं (Microsoft सेवा) ईमेल स्थान और कई अन्य सुविधाओं तक पहुंच प्रदान करता है. एक आउटलुक खाते के साथ, आप अपने मैसेजिंग, अपने कैलेंडर, अपने कार्यों और संपर्कों को किसी भी स्थान से एक्सेस कर सकते हैं जहां आपके पास इंटरनेट कनेक्शन और किसी भी डिवाइस से है.
आउटलुक ईमेल बनाने के लिए, बस इस लिंक पर जाएं.
फिर वह नया ईमेल दर्ज करें जिसे आप बनाना चाहते हैं, फिर अपना नया पासवर्ड ढूंढें. बाकी प्रक्रिया में, आपको अपना नाम और पहला नाम, अपना शहर और अपना जन्मदिन दर्ज करना होगा.
अब कई प्रमाणीकरणों के साथ, आपको कैप्चा की जांच करने के लिए कहा जाएगा, जो आपको यह सत्यापित करने की अनुमति देता है कि आप वास्तव में एक इंसान हैं जो एक ईमेल खाता बनाता है.
आउटलुक तब आपके खाते को कॉन्फ़िगर करेगा और होम पेज प्रदर्शित करेगा.
आउटलुक फीचर्स.कॉम
एक आउटलुक ईमेल खाता.कॉम उन सभी सुविधाओं की पेशकश करता है जिन्हें आप एक मैसेजिंग क्लाइंट से उम्मीद कर सकते हैं. इसके अलावा, वह समझता है:
- इसका बॉक्स लक्षित रिसेप्शन अपने सबसे महत्वपूर्ण ईमेल के लिए.
- इशारों संदेशों को संग्रहीत करने और हटाने के लिए स्कैन करना.
- की संभावना योजना के लिए एक विशिष्ट समय के लिए आपके रिसेप्शन बॉक्स में संदेशों की वापसी.
- के लिए एक विकल्प महत्वपूर्ण संदेश पिन करें अपने रिसेप्शन बॉक्स के शीर्ष पर.
- पाठ स्वरूपण सुविधाएँ अपने आउटगोइंग ईमेल को निजीकृत करने के लिए.
आउटलुक आपके कैलेंडर में ईमेल से यात्रा मार्ग और उड़ान योजनाओं को भी जोड़ता है. वह Google ड्राइव, ड्रॉपबॉक्स, OneDrive फ़ाइलें संलग्न करता है. आप अपने रिसेप्शन बॉक्स में सीधे Microsoft Office फ़ाइलों को भी संशोधित कर सकते हैं.
हॉटमेल पता कैसे बनाएं ?
Microsoft ने 1996 में हॉटमेल खरीदा. मैसेजिंग सेवा में कई नाम परिवर्तन हुए हैं, जिनमें एमएसएन हॉटमेल और विंडोज लाइव हॉटमेल शामिल हैं. हॉटमेल का नवीनतम संस्करण 2011 में जारी किया गया था. आउटलुक.कॉम ने 2013 में हॉटमेल को बदल दिया. उस समय, हॉटमेल उपयोगकर्ताओं को अपने हॉटमेल ईमेल पते रखने और आउटलुक के साथ उनका उपयोग करने की संभावना थी.कॉम. एक नया हॉटमेल ईमेल पता प्राप्त करना हमेशा संभव होता है.कॉम जब आप आउटलुक पर शिलालेख प्रक्रिया का पालन करते हैं.
जब आप पंजीकरण पृष्ठ पर होते हैं, तो आप @outlook के बीच बदल सकते हैं.fr, @outlook.कॉम और अंत में @hotmail.कॉम छोटे ड्रॉप -डाउन मेनू का चयन करके जो ईमेल इंटेलिजेंस फ़ील्ड के दाईं ओर है.
आउटलुक प्रीमियम क्या है ?
प्रीमियम आउटलुक आउटलुक का एक स्वायत्त भुगतान संस्करण था. Microsoft ने 2017 के अंत में प्रीमियम आउटलुक को छोड़ दिया, लेकिन इसने Microsoft 365 में शामिल Outlook डेस्कटॉप एप्लिकेशन में प्रीमियम सुविधाओं को जोड़ा.
जो कोई भी Microsoft 365 परिवार या Microsoft 365 कार्मिक सॉफ़्टवेयर पैकेज की सदस्यता लेता है. Microsoft 365 के लिए आउटलुक के लाभों में शामिल हैं:
- उपयोगकर्ता द्वारा 1 टीबी मेलबॉक्स.
- मैलवेयर विश्लेषण में सुधार.
- विज्ञापन के बिना एक रिसेप्शन बॉक्स.
- ऑफ़लाइन ईमेल रचना और स्वचालित सिंक्रनाइज़ेशन कैपेसिटीज.
- वैयक्तिकृत डोमेन.
जीमेल के लिए, यहां आपके आउटलुक पते के निर्माण के लिए वीडियो प्रक्रिया है:

एक मैसेजिंग सेवा की पेशकश करने के अलावा, याहू अन्य सेवाएं जैसे समाचार, वित्त, एक एफएक्यू, मौसम और कई अन्य प्रदान करता है.
याहू ईमेल पता बनाने के लिए, आपको पंजीकरण के लिए आधिकारिक वेबसाइट पर जाना होगा.
कनेक्शन फॉर्म के तहत खुलने वाले कनेक्शन पृष्ठ पर, “पर क्लिक करें” खाता बनाएं“” ” .
आपको एक फॉर्म दिखाई देगा ” पंजीकरण करवाना“” ” . अपने नए याहू खाते का विवरण यहां दर्ज करें, जैसा कि नीचे बताया गया है:
- पहला नाम : अपना पहला नाम यहाँ दर्ज करें.
- का नामपरिवार : अपना अंतिम नाम यहाँ टाइप करें.
- मेल पता : वह ईमेल पता टाइप करें जिसे आप बनाना चाहते हैं.
- शब्दसे अधिक है : अपने नए याहू खाते के साथ उपयोग करने के लिए पासवर्ड दर्ज करें.
- फ़ोन नंबर : एक देश कोड चुनें, फिर अपना फ़ोन नंबर दर्ज करें. आपको इस नंबर पर एक सत्यापन कोड प्राप्त होगा. तो सुनिश्चित करें कि यह काम करता है.
- महीने, दिन, वर्षजन्म : अनुरोधित विवरण दर्ज करें
- लिंग : संभवतः अपने सेक्स में प्रवेश करें.
सुनिश्चित करें कि आपने एक मजबूत पासवर्ड का उपयोग किया है. फिर, फॉर्म के निचले भाग में, “पर क्लिक करें” पहचानना“” ” .
आप एक पृष्ठ पर पहुंचेंगे ” अपना फ़ोन नंबर देखें“” ” . यहां, जांचें कि दर्ज किया गया फ़ोन नंबर सही है, फिर “” “पर क्लिक करें मुझे एक एसएमएस सत्यापन कोड भेजें“” ” .
याहू ने आपके फोन पर एक सत्यापन कोड भेजा है. अपने संदेशों की जाँच करें और एक बार मिलने के बाद, याहू पेज पर कोड दर्ज करें. फिर पर क्लिक करें ” जाँच करना“” ” .
जब सब कुछ अच्छा हो जाता है, तो आपको एक संदेश “वेलकम टू याहू” द्वारा स्वागत किया जाएगा, जो इंगित करता है कि आपका खाता सफलतापूर्वक बनाया गया है.
याहू होम पेज तक पहुंचने के लिए, “समाप्त” बटन पर क्लिक करें.
आपका याहू खाता अब बनाया गया है और उपयोग करने के लिए तैयार है. याहू की संदेश सेवा का उपयोग करने के लिए, याहू होम पेज के ऊपरी दाएं कोने में, “मेल” पर क्लिक करें.
इसी तरह, आप याहू द्वारा दी जाने वाली अन्य सभी सुविधाओं का उपयोग कर सकते हैं.
कैसे एक मुफ्त GMX ईमेल पता बनाएं ?

GMX मेल एक ऐसी प्रणाली है जो ईमेल भेजने और प्राप्त करने से परे जाती है. इसके निर्माण के बाद से, उन्होंने सभी प्रकार के कार्यों को एकीकृत करके विकसित करने और विकसित करने के लिए चुना है जो किसी के लिए उपयोगकर्ता अनुभव में सुधार करते हैं जो अपने सिस्टम का उपयोग करने का निर्णय लेते हैं: क्लाउड में फाइलों को संग्रहीत करना, घटनाओं, बैठकों और ब्याज के अन्य पहलुओं के साथ कैलेंडर का आयोजन करना, पर जाएं, जाएं। डोमेन रिकॉर्डिंग और कई अन्य फायदे के लिए.
GMX मेल के साथ अपना नया मैसेजिंग अकाउंट बनाना शुरू करने के लिए, पहला कदम उनकी वेबसाइट पर जाना है. फिर आपको बस “रजिस्टर” बटन पर क्लिक करना होगा. उसके लिए धन्यवाद, आप पंजीकरण प्रक्रिया तक पहुंच सकते हैं. तो पंजीकरण फॉर्म भरना शुरू करने के लिए उस पर क्लिक करें.
अब GMX टीम द्वारा अनुरोधित सभी डेटा लिखने का समय आ गया है. सबसे पहले, पहले और अंतिम नाम फ़ील्ड में सही ढंग से भरने से शुरू करें.
उसी तरह जैसे आप अन्य कोरियर के रूप में, आपको अपने लिंग, अपनी जन्मतिथि और अपने देश के निवास स्थान में प्रवेश करना होगा. एक बार जब ये पैरामीटर स्थापित हो गए हैं, तो अगली बात यह है कि वांछित ईमेल पता चुनें. अपने इच्छित ईमेल पते पर ध्यान दें और बाद में जो डोमेन चाहते हैं, उसे चुनें (” जीएमएक्स.es “ या ” जीएमएक्स.कॉम “).
फिर मेल की उपलब्धता की जांच करने के लिए दाईं ओर बटन पर क्लिक करें. यदि उपलब्ध हो, तो आप अगला कदम उठा सकते हैं.
अब आपको न्यूनतम 8 वर्णों के साथ एक पासवर्ड लिखना होगा और पत्रों और संख्याओं को संयोजित करने की सिफारिश के साथ, साथ ही साथ बड़े अक्षर और छोटे. आपको इसे दो बार लिखना होगा, एक बार परिचय के लिए और एक बार पुष्टि के लिए.
फिर, आप एक वैकल्पिक संपर्क ईमेल पता स्थापित कर सकते हैं, यह वैकल्पिक है, लेकिन यह बाद के उपयोगों के दौरान कनेक्शन समस्या की स्थिति में अनुशंसित है. “मैं एक रोबोट नहीं हूँ” पर क्लिक करें और, अंत में, पाठ के साथ नीले बटन पर “मैं स्वीकार करता हूं. मेरा खाता बनाएं “.
अब आपने GMX के साथ अपने नए ईमेल खाते की शुरुआती प्रक्रिया को समाप्त कर दिया है. “मेलबॉक्स को जारी रखें” पर क्लिक करके अपने नए मेलबॉक्स तक पहुँचें.
फिर, यहाँ वीडियो प्रक्रिया है (अंग्रेजी में):

इसमें अन्य दिलचस्प विशेषताएं भी हैं, जैसे कि बाद में ईमेल को दोहराने की संभावना, बाद में ईमेल की योजना बनाना और ईमेल को ऑफ़लाइन पढ़ना. आप उन ईमेलों को भी भेज सकते हैं जो समाप्त हो सकते हैं और एक अद्वितीय कोड को खोलने के लिए एक अद्वितीय कोड की आवश्यकता होती है, संदेशों को 15 जीबी क्लाउड में संग्रहीत करें, अपने Google ड्राइव खाते से फ़ाइलें साझा करें, संदेश भेजने को रद्द करें और उदाहरण के लिए अपनी छुट्टी के दौरान उत्तर स्वचालित रूप से कॉन्फ़िगर करें.
यदि आप चाहें, तो आप अपनी उपस्थिति को अनुकूलित करने, उन्नत मापदंडों के टन तक पहुंचने, फ़िल्टर और लेबल बनाने, अन्य मैसेजिंग खातों से ई-मेल आयात करने के लिए जीमेल इंटरफ़ेस में अलग-अलग थीम लागू कर सकते हैं।.
आप Gmail की सुविधाओं का विस्तार करने के लिए अतिरिक्त मॉड्यूल भी स्थापित कर सकते हैं.
फ़ायदे :
- अन्य Google सेवाओं के साथ पारदर्शी एकीकरण
- परिष्कृत मोबाइल अनुप्रयोग
- ईमेल भंडारण स्थान के बहुत सारे
- महान उपलब्धता
- समृद्ध पाठ संस्करण
- कुंजीपटल अल्प मार्ग
- उत्कृष्ट एंटी-स्पैम संरक्षण
नुकसान:
- सभी सुंदर ईमेल पते पहले से ही लिए गए हैं
- ई-मेल स्टोरेज स्पेस अन्य Google सेवाओं के साथ साझा किया गया है
- कभी -कभी लोड होने में समय लगता है.
2) याहू! ईमेल
याहू मेल उल्लेखनीय है, क्योंकि प्रत्येक नए उपयोगकर्ता को ईमेल के लिए 1 टीबी मुफ्त स्टोरेज से लाभ होता है. रचना विंडो जीमेल के समान है, लेकिन एक उपयोगी अंतर है, यह ऑनलाइन छवि संलग्नक और साधारण फ़ाइल संलग्नक के बीच स्विच करना आसान है.
याहू मेल शायद पहचान या वैकल्पिक उपनाम के मामले में सबसे अच्छी संदेश सेवा है.
आप अपने वास्तविक पते को प्रकट किए बिना अपने रिसेप्शन बॉक्स से जुड़े डिस्पोजेबल पते बना सकते हैं. यह सुविधा तब उपयोगी होती है जब आप उन खातों/समाचार पत्रों के लिए पंजीकरण करते हैं जिन्हें आप अपने सामान्य रिसेप्शन बॉक्स में नहीं चाहते हैं ताकि यह स्पैम्ड न हो या अनावश्यक ईमेल से भरा न हो.
याहू एंटी-स्पैम फ़ील्ड में बहुत अच्छा है, यह आपको एक अवरुद्ध सूची में ई-मेल पते जोड़ने की अनुमति देता है ताकि प्रेषक कभी भी आपके खाते की फ़ाइल तक नहीं पहुंचता.
फ़ायदे :
- बहुत सारे ईमेल स्टोरेज स्पेस के साथ दिया गया
- कीबोर्ड शॉर्टकट समर्थन
- एकीकृत एसएमएस संदेश
- अच्छा उपयोगकर्ता इंटरफ़ेस
नुकसान:
- अतीत में कई सुरक्षा घटनाएं
- मैसेजिंग डोमेन के लिए केवल एक विकल्प.
- अन्य मैसेजिंग आपूर्तिकर्ताओं के रूप में कोई फिल्टर/नियम नहीं.
3) आउटलुक
Microsoft Outlook Microsoft की मुफ्त ईमेल सेवा है, जो Gmail की तरह, इंटरफ़ेस को नेविगेट करने के लिए एक ठोस और आसान है. यह आसानी से सबसे अच्छा मुफ्त संदेश आपूर्तिकर्ताओं में से एक है.
वेबसाइट सहज है, यह उतना ही सरल है जितना कि अन्य विकल्पों को खोजने और हटाने और इस प्रेषक के सभी ई-मेल की खोज सहित अन्य विकल्पों को खोजने के लिए एक ईमेल पर सही क्लिक करना.
आउटलुक मैसेजिंग नियमों का समर्थन करता है, जिसका अर्थ है कि आप नए संदेशों को कॉन्फ़िगर कर सकते हैं ताकि वे स्वचालित रूप से एक निर्दिष्ट फ़ोल्डर में चले जाएं, चाहे वे वर्गीकृत हों, चिह्नित हों या स्थानांतरित हो जाएं यदि कुछ शर्तों को पूरा किया गया है.

फ़ायदे :
- स्वच्छ इंटरफ़ेस और उपयोग करने में आसान.
- अन्य Microsoft सेवाओं के साथ निकट सहयोग में काम करता है.
- मेल को स्वचालित रूप से व्यवस्थित करें.
- खाता के कई उपनाम आपके वास्तविक ईमेल पते को मास्क करते हैं.
नुकसान:
- कभी -कभी लोड होने में समय लगता है.
- वैध ईमेल को कभी -कभी स्पैम के रूप में चिह्नित किया जाता है
4) GMX मेल
GMX (ग्लोबल मेल एक्सचेंज) चार भाषाओं में GMX द्वारा प्रदान की गई एक मुफ्त संदेश सेवा है: जर्मन (सेवा की मुख्य भाषा), अंग्रेजी, स्पेनिश और फ्रेंच. GMX इस सूची में अन्य सभी मैसेजिंग सेवाओं से ऊपर है, इसकी अधिकतम आश्चर्यजनक रूप से 50 एमबी की उच्च अनुलग्नक सीमा है.
भारी संलग्नक भेजने के अलावा, GMX असीमित भंडारण स्थान भी प्रदान करता है, जिससे आप अपने ईमेल को उसी स्थान पर रखने की अनुमति देते हैं, जो स्थान की कमी के बारे में चिंता किए बिना.
वास्तव में GMX मेल के दो संस्करण हैं: एक जर्मन उपयोगकर्ताओं के लिए उपलब्ध है और एक अंतरराष्ट्रीय उपयोगकर्ताओं के लिए उपलब्ध है.
किसी भी कारण से, अंतर्राष्ट्रीय संस्करण दो कारकों का प्रमाणीकरण का समर्थन नहीं करता है. बड़े -स्केल सुरक्षा दोषों के युग में, पासवर्ड सुरक्षा के अलावा दो -factors प्रमाणीकरण का ध्यान न रखें, यह अनुचित लगता है, और हमें समझ में नहीं आता है कि GMX मेल अपने अंतर्राष्ट्रीय उपयोगकर्ताओं को अपने खातों को बेहतर ढंग से सुरक्षित करने की अनुमति क्यों नहीं देगा.
फ़ायदे :
- भारी संलग्नक का समर्थन करता है
- असीमित ई-मेल भंडारण स्थान
- मोबाइल एप्लिकेशन
- जर्मनी आधारित
नुकसान:
- GMX मेल का अंतर्राष्ट्रीय संस्करण दो कारकों के प्रमाणीकरण का समर्थन नहीं करता है
- मुफ्त संस्करण POP और IMAP एक्सेस का समर्थन नहीं करता है
एक ईमेल पते के निर्माण पर प्रश्न
ईमेल पते का क्या उपयोग है ?
एक ई-मेल पता एक है हमारे दैनिक डिजिटल संचार का प्रमुख तत्व. यह आपको दुनिया में कहीं भी स्थित लोगों के साथ संदेश भेजने और प्राप्त करने की अनुमति देता है, चाहे वह व्यक्तिगत या व्यावसायिक आदान -प्रदान के लिए हो.
ईमेल पता भी है अक्सर वेबसाइटों और ऑनलाइन सेवाओं के लिए पंजीकरण करने के लिए उपयोग किया जाता है. यह फिर अनुमति देता है एक डिजिटल पहचान बनाएं, यह जानकारी का एक सेट कहना है जो आपको इंटरनेट पर आपकी पहचान करने की अनुमति देता है. इस पहचान में आपका नाम, उपयोगकर्ता नाम, पता, पेशे, रुचि केंद्र, आदि शामिल हो सकते हैं।.
ई-मेल पते भी हैं जानकारी प्राप्त करने के लिए उपयोगी है. कई वेबसाइट और ऑनलाइन सेवाएं समाचार पत्र, विशेष ऑफ़र, सुरक्षा अलर्ट या ईमेल द्वारा अन्य महत्वपूर्ण जानकारी भेजती हैं. इस प्रकार आपको नवीनतम समाचार या वर्तमान प्रचार के बारे में सूचित किया जा सकता है.
यह भी अक्सर वेबसाइटों द्वारा पासवर्ड वापस करने के लिए चुने गए साधन भी हैं, भूलने के मामले में, कुछ पते भी इसके लिए समर्पित हो सकते हैं और केवल रिकवरी ईमेल पते.
सबसे सुरक्षित संदेश क्या है ?
सबसे सुरक्षित मैसेजिंग सिस्टम में ऐसे फ़ंक्शन शामिल होने चाहिए एंड -टो -ेंड एन्क्रिप्शन, L ‘प्रमाणीकरण, संदेश समाप्ति की समय सीमा और यह डेटा खोने की रोकथाम, ताकि संदेशों को आंखों या दुर्भावनापूर्ण हेरफेर के डर के बिना, संदेश भेजे और सुरक्षित रूप से प्राप्त किया जा सके.
एक आदर्श संदेश प्रणाली में भी होना चाहिए ठोस बैकअप तंत्र यदि मूल फाइलें खो जाती हैं या भ्रष्ट होती हैं.
आपकी ईमेल खोज के दौरान, गोपनीयता नीति पर भी विशेष ध्यान दें, जो पूरा होना चाहिए और वर्णन करना चाहिए कि आपकी बातचीत और व्यक्तिगत जानकारी अनधिकृत पहुंच या अपमानजनक उपयोग के खिलाफ कैसे संरक्षित है.
उसके ईमेल पते के लिए क्या नाम चुनना है ?
अपने ईमेल पते के लिए एक नाम चुनना एक बहुत महत्वपूर्ण निर्णय है. उस नाम के बारे में सोचें जिसे आप उपयोग करना चाहते हैं, क्योंकि यह है कि आप सभी लोगों द्वारा पहचाने जाने वाले सभी लोगों द्वारा पहचाने जाने वाले सभी लोगों द्वारा।.
- यह बेहतर है बहुत ही व्यक्तिगत या भावुक नामों का उपयोग न करें, और का एक ऐसा नाम चुनना जो स्पष्ट रूप से आपकी पहचान को दर्शाता है.
- आपको भी करना है पते की लंबाई को ध्यान में रखें यह सुनिश्चित करने के लिए कि यह यादगार है लेकिन संक्षिप्त है.
- जहां तक संभव हो, आंकड़ों का उपयोग करने से बचें एक ईमेल पते में, क्योंकि लोगों को याद रखने में परेशानी हो सकती है.
आप एक पेशेवर ईमेल पता बनाने पर भी विचार कर सकते हैं जो आपके पूर्ण नाम का उपयोग करता है यदि आप इसे पेशेवर उद्देश्यों के लिए उपयोग करने की योजना बनाते हैं, उदाहरण के लिए नौकरी के लिए आवेदन करने या सहकर्मियों के साथ संपर्क स्थापित करने के लिए.
हालांकि, जो भी आपकी पसंद है, यह सुनिश्चित करें सटीक और सफलतापूर्वक अपनी पहचान और अपने उद्देश्य का प्रतिनिधित्व करते हैं.
पेशेवर उपयोग के लिए समर्पित एक ईमेल पता बनाने का क्या उपयोग है ?
पेशेवर उपयोग के लिए समर्पित एक ईमेल पता बनाना है एक सफल और विश्वसनीय कैरियर बनाने के लिए आवश्यक है.
वह अनुमति देती है अपने आप को अधिक पेशेवर तरीके से प्रस्तुत करें, का अलग -अलग व्यक्तिगत और पेशेवर रिसेप्शन बॉक्स और का क्षेत्र में नियोक्ताओं, सहकर्मियों और अन्य संपर्कों के साथ ठीक से संवाद करें.
नेटवर्क या नौकरी की उम्मीदवारी के हिस्से के रूप में अन्य लोगों के साथ संवाद करते समय पते को याद रखना भी आसान है.
कुछ जेनेरिक के बजाय आपके नाम से जुड़ा एक ईमेल पता भी योगदान देगा दिखाएँ कि आप संगठित और सक्षम हैं.
अंत में, एक व्यक्तिगत डोमेन के साथ एक ईमेल का निर्माण दिखाएगा कि आपको अपने काम पर गर्व है और अपनी ब्रांड छवि में व्यावसायिकता जोड़ देगा.
क्या आप अपने फ़ोन से अपना ईमेल पता बना सकते हैं ?
हाँ, अपने फोन से एक ईमेल पता बनाना बहुत आसान है आजकल.
बस एक एप्लिकेशन डाउनलोड करें या अपने मोबाइल डिवाइस पर एक वेबसाइट का उपयोग करें.
ये सेवाएं नए इलेक्ट्रॉनिक पते बनाने के लिए व्यावहारिक तरीके प्रदान करती हैं जिनका उपयोग व्यक्तिगत और व्यावसायिक उद्देश्यों के लिए किया जा सकता है.
उदाहरण के लिए, जीमेल के पास एक एप्लिकेशन है जो आपको कुछ ही मिनटों में अपने फोन से एक नया खाता बनाने की अनुमति देता है.
अन्य लोकप्रिय ईमेल आपूर्तिकर्ता, जैसे कि आउटलुक और याहू, में भी एप्लिकेशन हैं जो आपको आसानी से अपने स्मार्टफोन के माध्यम से ई-मेल बनाने की अनुमति देते हैं.
आपको जो कुछ भी चाहिए वह सब कुछ एक वैध फोन नंबर और एक पासवर्ड शुरू करने के लिए है. एक बार कॉन्फ़िगरेशन प्रक्रिया पूरी हो जाने के बाद, आप आसानी से अपने मोबाइल डिवाइस पर सीधे ईमेल बना सकते हैं, भेज सकते हैं और प्राप्त कर सकते हैं !
फोन नंबर के बिना ईमेल खाता कैसे खोलें ?
फोन नंबर प्रदान किए बिना एक ईमेल खाता खोलना इन दिनों अधिक कठिन हो गया है, क्योंकि कई मैसेजिंग सेवा प्रदाताओं को सुरक्षा और दुरुपयोग की रोकथाम के कारणों की आवश्यकता होती है. हालांकि, इन चरणों का पालन करके टेलीफोन नंबर के बिना ई-मेल खाता खोलना हमेशा संभव होता है:
- सही आपूर्तिकर्ता चुनें : कुछ मैसेजिंग आपूर्तिकर्ताओं को पंजीकरण करते समय फोन नंबर की आवश्यकता नहीं होती है. प्रचुरता और टुटानोटा संदेश सेवाओं के उदाहरण हैं जो गोपनीयता का पक्ष लेते हैं और उन्हें फोन नंबर की आवश्यकता नहीं होती है.
- अन्य खातों से लिंक न करें : कुछ सेवाएं आपसे फ़ोन नंबर के लिए कहेंगी यदि आप अपने नए ईमेल खाते को अन्य सेवाओं से जोड़ने का प्रयास करते हैं (जैसे कि किसी अन्य प्लेटफ़ॉर्म पर मौजूदा खाता).
- झूठी संख्याओं के लिए बाहर देखो : कुछ को झूठे फोन नंबर में प्रवेश करने के लिए लुभाया जा सकता है. हालाँकि, इससे समस्या हो सकती है यदि सेवा इस नंबर पर एक सत्यापन कोड भेजती है या यदि इसका उपयोग खाता वसूली के लिए किया जाता है.
- वैकल्पिक सत्यापन पर विचार करें : कुछ सेवाएं टेलीफोन सत्यापन के विकल्प की पेशकश कर सकती हैं, जैसे कि ई-मेल सत्यापन.
- छोटे अक्षर पढ़ें : कभी -कभी फोन नंबर के लिए अनुरोध वैकल्पिक होता है, भले ही यह पहली नजर में न हो. पंजीकरण करते समय सभी निर्देशों और छोटे प्रिंटों को पढ़ना सुनिश्चित करें.
- बड़े प्लेटफार्मों से बचें : Google, Yahoo और Microsoft जैसे प्रमुख संदेश सेवा प्रदाताओं को फ़ोन नंबर का अनुरोध करने की अधिक संभावना है. यदि आप इस जानकारी को प्रदान करने से बचना चाहते हैं, तो आपको छोटे या अधिक विशिष्ट आपूर्तिकर्ताओं की तलाश करनी पड़ सकती है.
हालांकि, याद रखें कि फोन नंबर प्रदान करना आपके खाते में एक सुरक्षा परत जोड़ सकता है. यदि आप कभी भी अपना पासवर्ड भूल जाते हैं या यदि कोई आपके खाते को अवैध रूप से एक्सेस करने की कोशिश कर रहा है, तो फ़ोन नंबर के माध्यम से रिकवरी या सत्यापन एक जीवन बुआ हो सकता है.
रवाना होने से पहले ..
अगर यह लेख पर एक ईमेल पते का निर्माण आपको यह पसंद आया, इसे सोशल नेटवर्क पर साझा करने में संकोच न करें हमारे डिजिटल समाचार पत्र की सदस्यता लें हमारे अगले लेख प्राप्त करने के लिए.
आप हमारे RSS फ़ीड के माध्यम से हमारे सर्वश्रेष्ठ आइटमों का भी अनुसरण कर सकते हैं: https: // www.लेप्टिडिजिटल.Fr/टैग/न्यूज़लैटर-डिजिटल/फ़ीड/(आपको बस इसे अपने पसंदीदा RSS फ़ीड रीडर (Ex: feely)) में सम्मिलित करना होगा)).
हम लिंक्डइन, ट्विटर, फेसबुक और यूट्यूब पर भी सक्रिय हैं. हम वहां मिलते हैं ?
इस लेख से जुड़े किसी भी प्रश्न के लिए, अपनी टिप्पणी के बारे में बताने के लिए “टिप्पणियाँ” अनुभाग का उपयोग करने में संकोच न करें, हम आपको जल्द से जल्द (खुशी के साथ) का जवाब देंगे.
GMX: एक मेलबॉक्स का निर्माण

GMX पर एक ईमेल बॉक्स का निर्माण तेज और सरल है. बस बटन पर क्लिक करें “पंजीकरण करवाना”, होम पेज के शीर्ष दाईं ओर अपना खुद का व्यक्तिगत मेलबॉक्स बनाना शुरू करने के लिए. फिर आपको अपनी व्यक्तिगत जानकारी जैसे कि आपका नाम, पता और जन्म तिथि के साथ एक फॉर्म पूरा करने के लिए कहा जाएगा. ये डेटा निश्चित रूप से गोपनीय हैं: GMX उन्हें तीसरे पक्ष के साथ साझा नहीं करता है. आपको बस अपनी पसंद का ईमेल पता और अपना मुफ्त मेलबॉक्स प्राप्त करने के लिए एक सुरक्षित पासवर्ड दर्ज करना है. ध्यान रखें कि आपका पासवर्ड कम से कम 8 वर्ण होना चाहिए और ऊपरी और छोटे अक्षरों, प्रतीकों और संख्याओं दोनों को समझना चाहिए. अंत में, सुरक्षा कैप्टा को पूरा करें, नियम और शर्तों को पढ़ें और स्वीकार करें और आप अंत में अपने नए फ्री मेलबॉक्स का उपयोग शुरू कर सकते हैं !
एक GMX मेलबॉक्स बनाएं: फायदे
अक्सर, मेलबॉक्स के आपूर्तिकर्ता मुफ्त पहुंच के लिए धन्यवाद आकर्षित करते हैं, लेकिन उनके उपकरणों की कमी, उनकी विश्वसनीयता की कमी और कार्यात्मकताओं की सीमा से निराशा. GMX के साथ ऐसा नहीं है. हमारे मुफ्त ईमेल पते एक उच्च गुणवत्ता वाले अनुभव प्रदान करते हैं, जो आपके मेलबॉक्स के उपयोग को आसान और सुखद बनाने के लिए डिज़ाइन किए गए कई कार्यों के साथ मिलकर हैं.
यहाँ कुछ कार्यों का एक उदाहरण है जिससे आप लाभ उठा सकते हैं:
उपनाम पते
1 मेलबॉक्स में 10 उपनाम पते तक
यहूदी भागों की ऊंचाई
मेलचेक
आपके सभी संदेशों के लिए त्वरित पहुंच इंटरनेट ब्राउज़र एक्सटेंशन के लिए धन्यवाद प्राप्त हुई
ईमेल भंडारण
ईमेल भंडारण क्षमता के 65 जीबी तक
इष्टतम सुरक्षा गुणवत्ता
मोबाइल एप्लीकेशन
अपने स्मार्टफोन के लिए मोबाइल एप्लिकेशन आपको यात्रा करते समय अपने ईमेल से परामर्श करने की अनुमति देते हैं
एक ही समय में अपने ईमेल पते प्रबंधित करें
GMX में, हम आपके मेलबॉक्स का उपयोग आसान बनाना चाहते हैं, बिना सुविधाएँ दिए. इसलिए जब आप हमारे साथ एक ईमेल खाता बनाते हैं, तो आप 10 उपनाम ईमेल बना सकते हैं. इसके अलावा, आप उन सभी को एक ही मेलबॉक्स से प्रबंधित कर सकते हैं. इस तरह, आप आसानी से ईमेल, अलग पेशेवर और निजी पत्राचार बना सकते हैं, और यह निर्धारित कर सकते हैं कि आप प्राप्तकर्ता द्वारा देखे जाने वाले कौन से जानकारी देखी जाएगी. इसके अलावा, आप एक क्लिक के साथ अपने सभी ईमेल खातों तक पहुंचने के लिए MailCheck का उपयोग कर सकते हैं.
बहुत कम फ़ाइल सीमा को अलविदा
यदि आपके पास पहले से ही अन्य आपूर्तिकर्ताओं के साथ एक मुफ्त ईमेल पता है, तो आप शायद पहले से ही एक क्लासिक समस्या से परिचित हैं: अधिकतम फ़ाइल आकार. GMX में, हम समझते हैं कि दोस्तों और परिवार को कुछ छवियों या संगीत को भेजने के लिए किसी अन्य सेवा का उपयोग करना कितना कष्टप्रद है. इस प्रकार, हमारे साथ एक मुफ्त ईमेल पते का निर्माण आपको 50 एमबी की उदार अधिकतम सीमा से लाभान्वित करने की अनुमति देता है.
क्या आपको एक भारी फ़ाइल भेजने की आवश्यकता है ? कोई समस्या नहीं है, बस क्लाउड शेयरिंग फ़ाइल फ़ंक्शन का उपयोग करें जो हमारे साथ एक मेलबॉक्स बनाते समय शामिल है. GMX क्लाउड आपको मुफ्त में 2 GB प्रदान करता है और आपके स्टोरेज स्पेस को सुरक्षित करता है, जिससे आप आसानी से अपने संपर्कों के साथ फ़ाइलें साझा कर सकते हैं. इसलिए इससे कोई फर्क नहीं पड़ता कि आप अपने दोस्तों या सहकर्मियों के साथ क्या साझा करना चाहते हैं, हमेशा GMX के साथ एक समाधान होता है !
मेल बॉक्स: बेहतर सुरक्षा
GMX के साथ एक ईमेल पता बनाना यह आश्वासन है कि आपका रिसेप्शन बॉक्स और ईमेल द्वारा आपका पत्राचार पूरी तरह से सुरक्षित है. GMX मेल बॉक्स में प्रभावी एंटीवायरस सॉफ़्टवेयर शामिल हैं जो किसी भी मैलवेयर को समाप्त करता है जिसे आप स्पैम के माध्यम से प्राप्त कर सकते हैं, जैसे कि SPY सॉफ़्टवेयर और ट्रोजन वायरस (ट्रोजन हॉर्स). इसके अलावा, आप एक बुद्धिमान एंटी-स्पैम फ़िल्टर से भी लाभान्वित होते हैं जो अवांछनीय अक्षरों के साथ-साथ संभावित फ़िशिंग प्रयासों को अवरुद्ध करता है. आपका रिसेप्शन बॉक्स GMX के लिए साफ और सुरक्षित धन्यवाद रहता है.
अब अपने GMX मेलबॉक्स की खोज करें


 Ilyass बैरी – 26 जून, 2023
  मैं आपके साथ अपने बुरे अनुभव b नया एस्ट्रा साझा करता हूं . महीनों में खरीदी गई कार 10/22 में मुझे कैमरे की समस्याओं को समायोजित करने के लिए 360 और एयर कंडीशनिंग को समायोजित करने के लिए -Sales सेवा से लगभग 9 बार स्थानांतरित करने के लिए मजबूर किया गया था और अब मैं एक एनवी समस्या के सामने हूं: कॉकपिट और स्क्रीन जो अपने आप बंद हो जाती है . हैची कामेल और याला वास्लाह डब्ल्यू 5900 किमी वास्तव में मैं निराश हूं .
 WAFA HH – 22 फरवरी, 2022
  लेई राम – 23 फरवरी, 2022