डिकोडर प्लस एसएफआर को रीसेट करें, एसएफआर द्वारा एसएफआर द्वारा मेरे डिकोडर प्लस रेड को स्थापित और कॉन्फ़िगर करें
मेरे डिकोडर को अधिक स्थापित और कॉन्फ़िगर करें
Contents
- 1x ब्रॉडकॉम चिपसेट 43602
- केवल ग्राहक (कोई एपी या पुनरावर्तक नहीं)
- केवल 5GHz आवृत्ति बैंड की सक्रियता
- वाईफाई 5GHZ MIMO 3X3
- समर्थित मानक: 802.11 एन/एसी
- 1300 एमबीपीएस (सैद्धांतिक) का अधिकतम प्रवाह
कैसे मेरे डिकोडर प्लस एसएफआर को रीसेट करने के लिए और nbspdaut और nbsp द्वारा मापदंडों को पुनर्स्थापित करने के लिए?
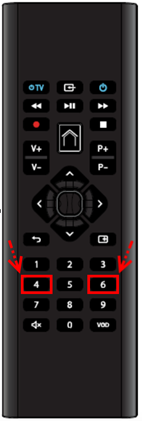
चाबी दबाएं 4 और 6 अपने रिमोट कंट्रोल से कुंजी फ्लैश तक घर : आपका रिमोट कंट्रोल अब फ़ैक्टरी मोड में रीसेट हो गया है.
मैं डिकोडर को रीसेट करता हूं
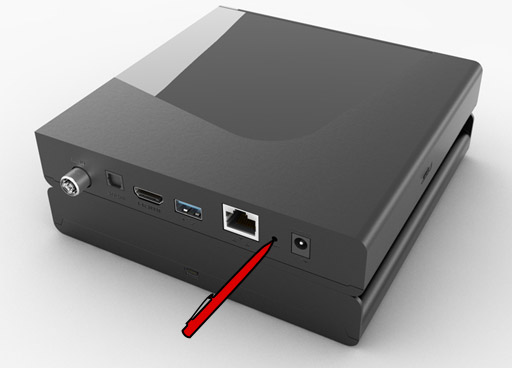
एक पेन या ट्रॉम्बोन के साथ, बटन दबाएं रीसेट डिकोडर के पीछे स्थित है.
आपका डिकोडर अब फैक्ट्री मोड में रीसेट हो गया है.
मैं रिमोट कंट्रोल को फिर से आकार देता हूं
डिकोडर का रीसेट रिमोट कंट्रोल के डिसिंक्रोनाइजेशन की ओर जाता है.
इसके अलावा, रीसेट के बाद, आपको डिकोडर के साथ रिमोट कंट्रोल के एसोसिएशन को फिर से करना होगा.
मैं अपने अधिकार नहर+ / कैनलसैट को फिर से सक्रिय करता हूं
डिकोडर प्लस एसएफआर का रीसेट कैनाल+ या/और कैनलसैट चैनलों के लिए आपकी सदस्यता से संबंधित आपके अधिकारों के नुकसान की ओर जाता है.
इसके अलावा, रीसेट के बाद, आपको अपने कर्तव्यों की नहर+/कैनलसैट को फिर से सक्रिय करना होगा.
आगे के लिए
यदि उपरोक्त जोड़तोड़ में से कोई भी काम नहीं करता है, तो SFR ग्राहक सेवा से संपर्क करने में संकोच न करें.
मेरे डिकोडर को अधिक स्थापित और कॉन्फ़िगर करें
वाईफाई के लिए धन्यवाद, इंटरनेट से कनेक्ट करना कभी आसान नहीं रहा है. बशर्ते आप अपने मॉडेम को अच्छी तरह से कॉन्फ़िगर करें. हमारी सलाह.
- एडीएसएल
- फाइबर / बहुत उच्च गति
एवो
एवो
डिकोडर+
![]()
छोटा
- मेरे पैक की जाँच करें
- मेरा डिकोडर सेट करें
- मेरे डिकोडर को कॉन्फ़िगर करें
- वाईफाई मोड में मेरे डिकोडर को कनेक्ट करें
- रिमोट कंट्रोल के साथ खुद को परिचित करें
मेरे पैक की जाँच करें
आपका डिकोडर प्लस पैक विभिन्न तत्वों से बना है.
- डिकोडर प्लस
- एक 12V/2.5A बिजली की आपूर्ति
- एक रिमोट कंट्रोल (2 बैटरी के साथ आपूर्ति की गई)
- एक HDMI® हाईस्पीड केबल (4K वीडियो प्रवाह संगत)
- एक RJ45 ईथरनेट केबल
- एक स्टैकेबल हार्ड ड्राइव (वैकल्पिक)
- एक माइक्रो यूएसबी-यूएसबी केबल (हार्ड ड्राइव के साथ पैक में आपूर्ति की गई)
बारीकी से देखा, आपका डिकोडर इस तरह से बहुत है:
- है. लाल/हरी शक्ति का नेतृत्व किया
- बी. डब्लूपीएस बटन
- बनाम. माइक्रो एसडी पोर्ट
यहाँ इसकी तकनीकी विशेषताएं हैं
- 1x लाइव फ्लो 2160p + Quick’zap + Pip (1080p) + 2x PVR 2160p
- वीडियो संगतता:
- एसडी / एचडी / यूएचडी / 3 डी
- एमपीईजी -2
- एमपीईजी -4 बीसी / एच.264
- HEVC / H.265
- 1x ब्रॉडकॉम चिपसेट 43602
- केवल ग्राहक (कोई एपी या पुनरावर्तक नहीं)
- केवल 5GHz आवृत्ति बैंड की सक्रियता
- वाईफाई 5GHZ MIMO 3X3
- समर्थित मानक: 802.11 एन/एसी
- 1300 एमबीपीएस (सैद्धांतिक) का अधिकतम प्रवाह
- 1 गीगाबिट पोर्ट ईथरनेट RJ45
- 1 HDMI 2 आउटपुट.0 / hdcp2.2
- 1 DVB-T/T2 एंटीना प्रवेश (महिला में RF)
- 1 ऑप्टिकल डिजिटल ऑडियो आउटपुट
- 1 यूएसबी 3 पोर्ट.0
- 1 माइक्रो-एसडी कार्ड रीडर
- ब्लूटूथ 4.1 (AD2P ऑडियो)
- ब्लूटूथ
- बुद्धिमान सार्वभौमिक रिमोट कंट्रोल फ़ंक्शन
- अज़ट्टी कीबोर्ड
- माऊस पाइंटर
मेरा डिकोडर सेट करें
- अपने डिकोडर का स्थान अधिक चुनें
- इस स्थान को अच्छी गर्मी अपव्यय की अनुमति देनी चाहिए (प्रत्येक तरफ कम से कम 5 सेंटीमीटर मुक्त स्थान प्रदान करें).
- अपने डिकोडर को कवर न करें और सुनिश्चित करें कि पक्षों पर होने वाले वेंट को बाधित न करें.
- ईथरनेट केबल की आपूर्ति का उपयोग करके अपने डिकोडर प्लस को अपने लाल बॉक्स से कनेक्ट करें.
- प्रदान की गई HDMI केबल का उपयोग करके अपने टीवी को अधिक डिकोडर के साथ कनेक्ट करें, सबसे अच्छी छवि गुणवत्ता प्राप्त करने के लिए, विशेष रूप से पूर्ण एचडी और अल्ट्रा एचडी वीडियो प्रवाह (4K) की वापसी के लिए.
यदि आपके टेलीविजन में HDMI सॉकेट नहीं है, तो HDMI/साइड एडाप्टर (आपूर्ति नहीं) का उपयोग करें. इस मामले में, आप इष्टतम वीडियो गुणवत्ता का आनंद नहीं ले पाएंगे. - एंटीना प्लग से अपने डिकोडर को अधिक कनेक्ट करें . यह वैकल्पिक कनेक्शन आपके आवास के एंटीना से सीधे टीएनटी चैनल प्राप्त करना संभव बनाता है. यह आपके इंटरनेट एक्सेस की गति में सुधार करने की सिफारिश की जाती है.
- अपनी हार्ड ड्राइव को अपने डिकोडर प्लस से कनेक्ट करें
- आप अपनी पसंद की हार्ड ड्राइव को डिकोडर प्लस के USB पोर्ट से कनेक्ट कर सकते हैं. कृपया ध्यान दें, इस मामले में, डिकोडर से कनेक्ट होने से पहले आपकी हार्ड ड्राइव को स्वरूपित किया जाना चाहिए.
- बिजली की आपूर्ति को अपने डिकोडर प्लस से कनेक्ट करें. आपका डिकोडर स्वचालित रूप से चालू हो जाता है. आप अगला कदम उठा सकते हैं.
- सुनिश्चित करें कि आपका रेड बॉक्स मॉडेम प्लस इंटरनेट से जुड़ा हुआ है और जुड़ा हुआ है. अन्यथा, यह काली स्क्रीन होगी !
- जांचें कि टीवी पर चुना गया HDMI स्रोत उस सॉकेट से मेल खाता है जिस पर डिकोडर जुड़ा हुआ है. यदि यह मामला है, तो आपके डिकोडर प्लस का होम पेज स्क्रीन पर दिखाई देना चाहिए.
- अपने डिकोडर प्लस पैक में शामिल रिमोट कंट्रोल में बैटरी (प्रदान) स्थापित करें.
- स्वागत . जब होम स्क्रीन दिखाई देती है, तो अपने रिमोट कंट्रोल पर “ओके” बटन दबाएं.
- स्थानीय नेटवर्क संबंध . “ईथरनेट केबल” द्वारा कनेक्शन मोड पसंद करें.
- वाईफाई कनेक्शन . Wifi और इंटरनेट कनेक्शन को सक्रिय करने के लिए अपने बॉक्स पर WPS कुंजी दबाएं.
- अद्यतन . कुछ मिनटों तक प्रतीक्षा करें जब तक कि स्क्रीन आपको अपने डिकोडर को पुनरारंभ करने के लिए नहीं कहती है. “ओके” कुंजी दबाएं.
- अपने रिमोट कंट्रोल को सिंक्रनाइज़ करें . “हाउस” बटन की चमकती या अपने वॉयस रिमोट कंट्रोल के लिए शीर्ष पर एक प्रकाश निश्चित बिंदु की उपस्थिति तक 7 और 9 कुंजियों को एक साथ दबाएं.
- टीएनटी . यदि आपने अपने डिकोडर को एंटीना सॉकेट से अधिक कनेक्ट किया है, तो “टीएनटी में उपलब्ध चैनलों के लिए खोज करें” का चयन करें. अन्यथा, “टीएनटी का उपयोग न करें” का चयन करके इस कदम को लें.
- कोड्स . एक व्यक्तिगत कोड (नाबालिगों की सुरक्षा) और एक व्यक्तिगत कोड (कुछ कार्यों तक पहुंच की सुरक्षा) चुनें.
- वेलकम स्क्रीन (या होम पेज) तक पहुंचने के लिए रिमोट कंट्रोल पर “होम” बटन दबाएं.
- दिशात्मक कुंजियों का उपयोग करके, “सेटिंग्स” का चयन करें और “ओके” कुंजी के साथ मान्य करें.
- “स्थापना” का चयन करें.
- “कनेक्शन” का चयन करें.
- “वाई-फाई वायरलेस” का चयन करें.
- अपने टीवी डिकोडर को कनेक्ट करने के लिए अपने बॉक्स पर WPS बटन दबाएं. कनेक्शन स्वचालित रूप से बनाया जाता है.
- रिमोट कंट्रोल में 2 बैटरी (प्रदान की गई) डालें,
- यदि आपका रिमोट कंट्रोल निष्क्रिय है, तो 1 और 3 कुंजियों को एक साथ “हाउस” या अपने वॉयस रिमोट कंट्रोल के लाइट पॉइंट की चमक के लिए दबाएं,
- टेलीविजन होम पेज से, “सेटिंग्स” पर जाएं और “ओके” कुंजी (दिशात्मक कुंजियों के बीच) दबाएं,
- “फेलेक्टर” चुनें और “ओके” बटन दबाएं,
- “एसोसिएट ए रिमोट कंट्रोल” चुनें और “ओके” कुंजी दबाएं. एक संदेश आपको अन्य रिमोट कंट्रोल को अनइंस्टॉल करने वाले रेडियो आवृत्ति की चेतावनी देता है. इसका मतलब यह है कि यदि आपके पास डिकोडर के लिए अन्य रिमोट कंट्रोल हैं, तो वे केवल तभी संचालित करते रहेंगे जब आप उन्हें अपने डिकोडर पर इंगित करते हैं. संदेश को मान्य करने के लिए “ओके” कुंजी दबाएं.
- जब संदेश “कृपया अपने रिमोट कंट्रोल के 7 और 9 कुंजियों को दबाएं” तो आपके टेलीविजन पर प्रदर्शित किया जाता है, एक ही समय में 7 और 9 कुंजियों को दबाएं जब तक कि संदेश “वर्तमान सिंक्रनाइज़ेशन में सिंक्रनाइज़ेशन”. कृपया 4 सेकंड के लिए प्रतीक्षा करें… ”दिखाई देता है.
- एक संदेश जो आपको सूचित करता है कि आपका रिमोट कंट्रोल जुड़ा हुआ है, आपके टीवी पर प्रदर्शित होता है. “ओके” कुंजी दबाएं. आपका रिमोट कंट्रोल अब आपके डिकोडर और पूरी तरह से परिचालन के साथ जुड़ा हुआ है !
- एक रिमोट कंट्रोल केवल एक डिकोडर को जोड़ा जा सकता है.
- एक डिकोडर को कई रिमोट कंट्रोल के साथ जोड़ा जा सकता है.
- युग्मन को रिमोट कंट्रोल में संग्रहीत किया जाता है: भले ही बैटरी हटा दी गई हो, जानकारी रखी जाती है.
- 1 + 3 “हाउस” कुंजी की चमकने के लिए कीज़: इन्फ्रारेड ट्रांसमिशन से रिमोट कंट्रोल को राउंडिंग ट्रांसमिशन तक. 1+3 पर एक नया समर्थन आपको फिर से फैशन बदलने की अनुमति देता है.
- 4 + 6 “हाउस” कुंजी की चमकने की कुंजी: फ़ैक्टरी मोड (इन्फ्रारेड) में रिमोट कंट्रोल को रीसेट करें और रिमोट कंट्रोल / डिकोडर कपलिंग को रद्द करें.
- 3 सेकंड के लिए 0 + 2 कुंजी: यूनिवर्सल रिमोट कंट्रोल के कॉन्फ़िगरेशन को मिटा दें.
- मोज़ेक इंटरफेस, मिनी-गाइड, द कम्प्लीट गाइड में फास्ट नेविगेशन (पेज से पेज से पेज से आगे) के लिए पी+/पी-कीज़ का उपयोग किया जाता है।.
- “प्ले” कुंजी आपको होम पेज और “माई वीडियो” और “माई रिकॉर्डिंग” पार्टियों से चयनित सामग्री के दृश्य को सीधे लॉन्च करने की अनुमति देती है.
- एक वीओडी सत्र के दौरान, बाईं / दाएं दिशात्मक कुंजियों पर समर्थन आपको सामग्री के कुल समय के 10 % के वीडियो में कूदने की अनुमति देता है (एक फिल्म के लिए लगभग 10 मिनट).
मेरे डिकोडर को कॉन्फ़िगर करें
आपके शुरू करने से पहले
डिकोडर सेट करें
डिकोडर को स्थापित करने के लिए, अपने टीवी स्क्रीन पर संकेतित चरणों का पालन करें. 1 कॉन्फ़िगरेशन के लिए, हम वाईफाई द्वारा कनेक्शन के लिए एक ईथरनेट केबल कनेक्शन की सलाह देते हैं, बाद में बनाने के लिए आसान.
वाईफाई मोड में मेरे डिकोडर को कनेक्ट करें
अपने डिकोडर प्लस को ईथरनेट मोड (केबल) से वाईफाई मोड में स्विच करने के लिए:
रिमोट कंट्रोल के साथ खुद को परिचित करें
अपने डिकोडर के साथ रिमोट कंट्रोल को मिलाएं
अपने डिकोडर द्वारा अपने रिमोट कंट्रोल को मान्यता प्राप्त करने के लिए, आपको 2 उपकरणों को संबद्ध करना होगा.
यदि यह अभी तक नहीं किया गया है, तो निम्नानुसार आगे बढ़ें:
पहले कदम
अपने डिकोडर प्लस को पायलट करने के लिए अपरिहार्य, आपका नया बुद्धिमान रिमोट कंट्रोल कई फायदे को छिपाता है. यह विशेष रूप से रेडियो आवृत्ति में संचालित होता है, ताकि इसके चैनल को बदलने के लिए इसे डिकोडर को इंगित करना आवश्यक न हो.
मेरे रिमोट कंट्रोल का विस्तार:
मेरे मुखर रिमोट कंट्रोल का विस्तार:
शॉर्टकट की खोज करें


 Ilyass बैरी – 26 जून, 2023
  मैं आपके साथ अपने बुरे अनुभव b नया एस्ट्रा साझा करता हूं . महीनों में खरीदी गई कार 10/22 में मुझे कैमरे की समस्याओं को समायोजित करने के लिए 360 और एयर कंडीशनिंग को समायोजित करने के लिए -Sales सेवा से लगभग 9 बार स्थानांतरित करने के लिए मजबूर किया गया था और अब मैं एक एनवी समस्या के सामने हूं: कॉकपिट और स्क्रीन जो अपने आप बंद हो जाती है . हैची कामेल और याला वास्लाह डब्ल्यू 5900 किमी वास्तव में मैं निराश हूं .
 WAFA HH – 22 फरवरी, 2022
  लेई राम – 23 फरवरी, 2022